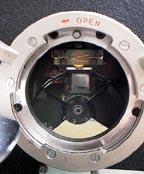
5

In the days before LCDs and digital cameras, manually focusing an interchangeable lens still camera wasn't a whole lot different than it is today. In most designs, you had a mirror that gave the photographer a through-the-lens view, allowing them to accurately focus. When the shutter button was pressed, the mirror flipped out of the way, exposing the film.

However, this method is obviously not usable for the continuous focusing required by video camera operators. Modern cameras solve this problem by using Live View. How was this problem solved in the film days?

2
  • Hey Chinmay, welcome to Video Production.
    – AJ Henderson
    Commented Mar 3, 2014 at 2:07
  • @AJHenderson: Thanks! I don't really do video, but I might stick around. Looks like there are some interesting questions on here! Commented Mar 3, 2014 at 13:28

2 Answers 2

3

There are two main ways this was solved:

1. Measuring Focus

When using this method, the focus puller measures the distances at every point during the shot, and then pulls focus to these marks, at times making adjustments when an actor or grip misses their mark.

This still occurs today, however is becoming less prevalent due to the filmmaking styles being used (handheld, where the same marks are not hit each time).

2. Video Assist

Using one of several methods, including half-silvered mirrors, CCD sensors behind the film negative, and telecine transfers, a video split is made. On modern productions shooting on film, this split is what is sent to 'Video Village', where the director sits.

Telecine Transfer (Not the correct term)

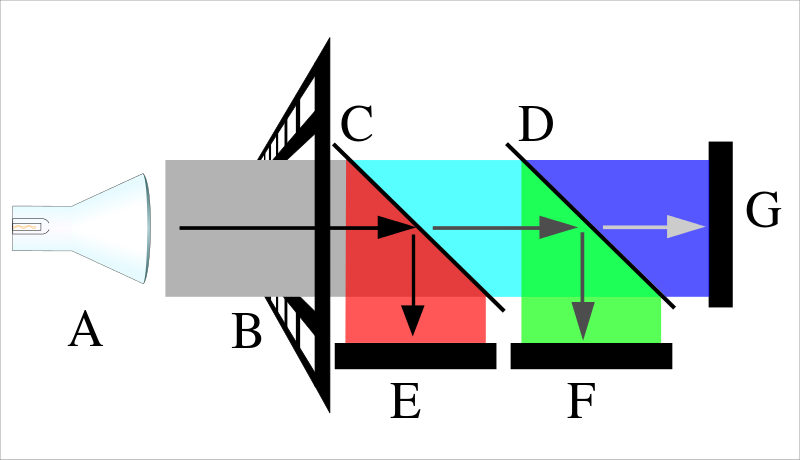
I've never really understood how it worked, until now, so I present this lovely diagram from Wikipedia:
enter image description here

In essence, the light shines in and exposes the negative. After that, it passes through a series of half-silvered mirrors, each time being split into separate light components and recorded onto an imaging chip. These are them combined, and displayed in the viewfinder, or as a video-out.

One side effect of this method, is the mechanical shutter is visible, as a black screen lasting 1/50th of a second, 25 times a second (whenever the negative itself is not exposed).

3. Parallel Sight

Common throughout the 1950s and 60s, having a parallel sight (separate lens, like what you had on a cheap film point-and-shoot camera) allowed the operator to see approximately what was being exposed onto the negative.

4. Half-Silvered Mirror

Update: Added from AJ Henderson's comment below.

As mentioned in the comment, a very cheap way of getting an image to a viewfinder was to simply use a half-silvered mirror, somewhere between the lens and the negative. In this way, half the light transmitted through the lens exposes the negative, and half is seen through the operator's viewfinder.

This method does not allow for multiple viewfinders, monitors, or screens, unless another split is created.

5
  • Great answer! But what about non-studio work? How the hell did they focus when doing say, wildlife? Commented Mar 2, 2014 at 23:09
  • 1
    I'm not going to add my own answer here since I think this answer is best quality, but a slightly lower quality, but cheaper option is a simple half silvered mirror to reflect light to the viewfinder. It does cause a little bit of light to bleed into the film chamber, but it's a relatively small amount. A fixed half silvered mirror could send light to the viewfinder while also still exposing the film. I'm not 100% certain, but I seem to recall this being used in some consumer grade film cameras. (I was very young when they were still even a little in use though, so my memory could be off.)
    – AJ Henderson
    Commented Mar 3, 2014 at 2:13
  • @ChinmayKanchi They would've used one of the above methods to create an image in the viewfinder, and focussed by eye. Several things made this possible, including audiences' tolerance to out-of-focus footage, less sharp lenses (so the difference between in and slightly out footage was less), and operators were just generally better at estimating distances (similar to how a film photographer can estimate exposure, where a digital one often has no idea - it's a skill they never needed to learn)
    – nchpmn
    Commented Mar 3, 2014 at 10:32
  • Telecine is for transferring film to video, it has nothing to do with the video split on film cameras. Basically a video split (aka video assist) is just a small video camera focused on the ground glass screen in the camera's viewfinder.
    – stib
    Commented Mar 4, 2014 at 10:15
  • We are used to 1080p quality images today. NTSC is equivalent to 420p, so its sharpest image looks blurry to modern audiences. Hand focusing with a telephoto lens is sufficiently sharp for NTSC and PAL video work.
    – pojo-guy
    Commented Nov 9, 2017 at 6:25
5

Good quality film cameras have a reflex viewfinder system, where "reflex" means that you're viewing through the lens, and thus you can judge focus by eye.

To achieve this There are, er were, two basic strategies:

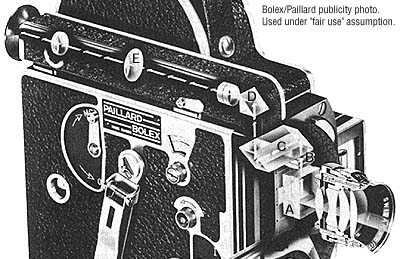
  1. Split the beam of light from the lens with a prism or half silvered mirror, meaning that most of the light goes to the film, and a bit goes to the viewfinder. Advantages: no shutter flicker, cheaper. Disadvantages: less light, both for exposing the film, and a dimmer image in the viewfinder (in low light situations it can make it difficult to focus or even see what's going on). This is how my Bolex camera does it.

    promotional picture showing light path in a bolex camera

  2. Position a revolving mirror between the lens and the film plane. While the film is being pulled down by the sprockets the mirror moves into place, bouncing the light into the viewfinder, and once the film is ready to be exposed, the mirrors swings around and the viewfinder goes temporarily black. It's basically what an SLR camera does, but instead of flipping up the mirror is rotating. Advantages: more light for the film and the viewfinder, one less optical element in the light path, ability to vary the angle of the shutter allowing for fine control over exposure without affecting the depth of field. Disadvantages: More complicated (=expensive), flicker in viewfinder (actually I think this is something of an advantage, because you always could tell when the camera was running, and also when filming video displays you could make sure that the balck bar was visible in the viewfinder, and therefore not visible to the film), some degree of rolling shutter.This is how my CP16 does it, as well as pretty much all professional cinema cameras.

    rotating mirror in CP-16 camera the mirror is the thing that looks like a bow tie.

As you can see, both methods allowed the operator to see through the lens while filming, allowing for on-the-fly focusing. Video splits also allowed a live video feed to be set up, meaning the focus puller (and director etc.) could have a monitor, but this was relatively late in the piece. A video split is basically a video camera bolted on to where the eyepiece goes, or sometimes with a separate beam-splitter. Until video splits came along the focus puller checked the focus points in the rehearsal, made marks on the floor with camera tape, consulted their cinematographer's manual for the depth-of-field charts, and eyeballed it.

You'n whippersnappers don't know how easy you gots it. Now get off my lawn!

Your Answer

By clicking “Post Your Answer”, you agree to our terms of service and acknowledge you have read our privacy policy.

Not the answer you're looking for? Browse other questions tagged or ask your own question.